Tuesday, September 27, 2011

No Calorie Candy Corn

So I was pursing Pinterest the other day (who am I kidding, everyday) and found this tutorial on making old glass bottles or jars into cute Halloween decorations!


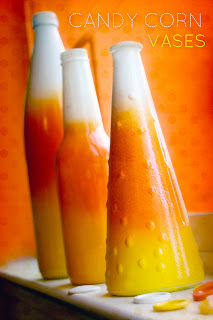
So I was all stoked to do this went to the dollar store and picked out my vases and then headed over to the craft store to pick up the paint. Then I just kept thinking about how pretty my brand new vases were, and how I would have to store them somewhere, and how I was about to pay for three cans of spray paint and not use that much of it, and then I just kept thinking and thinking and thinking about how I don't really need candy corn bottles.

I just LOVE candy corn - a lot.

So I started thinking - in a more linear fashion this time - and thought if I could use scrapbook paper I could change the paper out every season.

So with my vases, a few sheets of colored paper and my paper shredder - this is what I came up with!

Tuesday, September 20, 2011

Home Dec Project

Okay, so we have recently moved into a much smaller space. I've been checking out Ikea for something to help organize my cooking supplies. But to no avail.

So, just to get these bigger pieces out of the way I put up some command hooks and up they went. Once they were up, you know what, I actually liked the way it looked! Add a little vinyl from my (dusty) cricut and it was a cute it accessory to my small kitchen.

Monday, September 19, 2011

Falling for Crafts - Project #2

Well you know I'm loving all the great ideas over at One Artsy Mama - and this is week two of the Falling for Crafts Challenge!

This week it's a Fall snack or recipe. I have to say when I think of Fall I think of warm Artichoke and Spinach Dip - think restaurant dip times 10. This always gets rave reviews and now I'm sharing with you!!

What you need:
8 oz frozen chopped spinach - thawed
1 jar Alfredo sauce - I just get whatever is the cheapest ;)
1 (14 oz) can of Artichoke hearts - make it doesn't have oil in it
2 cups shredded mozzarella cheese
4 oz cream cheese - softened and cut into small cubes
Garlic Powder
9 by 9 baking dish

Step one - sprinkle bottom of pan with garlic powder
Add the remaining ingredients and stir.
Bake at 350 until bubbly - about 30 minutes. I usually stir about 1/2 way through.


Enjoy with tortilla chips and try not to each the whole pan yourself!! Delish!!

Check out the other yummy snacks and the 9 giveaways going on right now!

Thursday, September 15, 2011

Glitter Shoe Repair!

About a month ago I took Kellie shoe shopping. I blame this on my youth - I was NEVER allowed to get the cute shoes, just the shoes that would last the longest (and in a size to big so they would last longer) I have to say the hubs was none too pleased when we returned with these glitter shoes. She REALLY wanted them, and she is an ONLY child!!

The fact that I also purchased her some practical sneakers (stans glitter) as well was no excuse.

"They won't last a month!" He said.

Unfortunately, this is one of those times hubs was 100% correct.
After a few weeks the super cute shoes looked more like this...


So I found a tutorial (on Pinterest of course) on how to make your own glitter shoes. I took this concept and, as much as it pained me to use the most dreaded craft item of all time (glitter), decided I could 'fix' Kellie's poor shoes.

You would need:
Glitter - she was wearing her shoes (as she has everyday for the last month) and we matched the color as best we could.
Mod Podge
Spray Adhesive
Disposable foam brush

I used about 1/4 cup mod podge and dumped glitter into it until it was a thicker glitter paste.
The glitter paste was spread on the glitter-free portions of the shoes - I then waited about an hour and added another coat.
Once there was enough glitter I took the shoes outside and sprayed them with a light coat of the spray adhesive. I was going to skip this step, but learned that mod podge is NOT water-resistant! So you MUST use the spray adhesive as well if you want these to last!

They ended up like this! Not to shabby!!
*I'll continue to do this until they just can't be salvaged any further!!*

Wednesday, September 14, 2011

Fall Centerpiece Challenge

I wanted to do something for the Fall Inspired Challenge on OneArtsyMama's blog, she will be posting a new challenge each week - this weeks challenge is "Fall Centerpieces"

This is what I came up with!
Simple - just a bowl of candy corn and eucalyptus from the craft store.


Monday, September 12, 2011

Crayon Art

I've been seeing these all over Pintrest and love them! Yesterday Kellie looks at me and says, "Mom, we need to do something creative." That girl is a crafter in the making...


DONE! We put this 'as is' in Kellie's room - I'm still trying to decide if I'm going to put a frame on it or not. Perfect for her room!

Saturday, September 10, 2011

The 100 Post Tutorial

EARRING DISPLAY TUTORIAL


This is post number 100!! So I wanted to do something I never have before - a tutorial!

I have been digging through a drawer of earrings for years and years - and it seems the number of earring is higher every time I go shopping! The problem with having so many earrings in one place is that you end up forgetting that one pair or REALLY cute earring that keeps getting pushed around.

I have seen a few ideas similar to this on Pintrest and Stumbleupon and wanted to see if I could figure it out on my own - and I did! This makes my earrings look like a great piece of art in my bathroom and gets them where I can see them!

So now I'm sharing!

What you need:
Picture Frame with mat
Stapler
Thumb tacks
Scissors
Black screening - I got this form Home Depot in a big roll
Embellishments - I used one long ribbon
1 hour - or less

Start by taking the fame apart and setting aside the glass and backing for a future project.
Cut the black screening to the size or your inside mat, leaving a one inch boarder on each side.


Staple the first side to the mat. Pull the screening tight to the opposite side and staple.
You will not have the two 'sides' attached and the 'top' and the 'bottom' will be unattached.

Staple the top and bottom as you did each side.


Fold the corners and staple.


Place the inside frame back into the outside frame - you may have to push it in there. The size of the inside frame is now bigger.
Use the thumb tacks to secure the inside frame and keep it from falling out. (I inserted mine at a slight angle.)


Add your embellishments and hang.

Insert your earrings into the screen.


You're done!!!
If you'd like a printable copy of this tutorial just let me know!

Happy Crafting!!

Tuesday, September 6, 2011

Giveaway Alert!

I was linked to this blog through One Artsy Mama - and 'Creative Carmella" has some great ideas. Add to that an awesome giveway and I'm totally sold!!

Check it out HERE


Thursday, September 1, 2011

Giant Granny Square

As you may remember from THIS POST- I've been working on a giant granny square and now I've finally got it finished - this photo is the blanket on my queen sized bed. I've been working on this blanket since December (mostly due to the amount of yarn - about 16 total skeins- this required, resulting in my husbands pet name for the project 'the yarn hog'), and I'm so glad to finally have it finished. This is for my BESTEST friend in the WHOLE world who lives all the way in Montana.

Her favorite colors are dark green, navy and dark purple -- I added the gray to breakup the darker colors a bit.


I used a standard granny square pattern with a "K" hook and just kept going and going and going until I couldn't stand it any more!

I almost hate to let this go, I used a bulky weight yarn so it's very soft and comfy!